[av_one_full first min_height=” vertical_alignment=’av-align-top’ space=” margin=’0px’ margin_sync=’true’ padding=’20px’ padding_sync=’true’ border=” border_color=” radius=’0px’ radius_sync=’true’ background_color=’#e4e4e4′ src=” attachment=” attachment_size=” background_position=’top left’ background_repeat=’no-repeat’]
[av_textblock size=” font_color=” color=”]
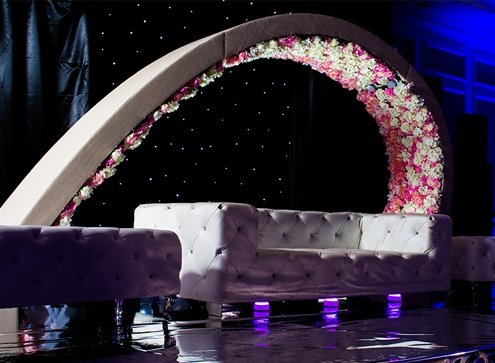
Wedding and Events Decoration Props – Upholstered Arbor
A very dear friend, a wedding planner, Afsand Khan, had this vision to decorate the wedding stage with a majestic and grand nicely upholstered arbor that would stand 9 feet high and span 15 feet wide. We started sketching on a piece of paper and the journey to build the arbor started.
[/av_textblock]
[/av_one_full][av_two_third first min_height=” vertical_alignment=’av-align-top’ space=” margin=’0px’ margin_sync=’true’ padding=’0px,20px,0px,20px’ border=” border_color=” radius=’0px’ radius_sync=’true’ background_color=” src=” attachment=” attachment_size=” background_position=’top left’ background_repeat=’no-repeat’]
[av_image src=’http://nafeescreations.com/wp-content/uploads/2017/03/wedding-arbor-1.jpg’ attachment=’1611′ attachment_size=’full’ align=’center’ animation=’no-animation’ styling=” hover=” link=” target=” caption=” font_size=” appearance=” overlay_opacity=’0.4′ overlay_color=’#000000′ overlay_text_color=’#ffffff’][/av_image]
[av_hr class=’custom’ height=’50’ shadow=’no-shadow’ position=’center’ custom_border=’av-border-thin’ custom_width=’50px’ custom_border_color=” custom_margin_top=’15px’ custom_margin_bottom=’15px’ icon_select=’no’ custom_icon_color=” icon=’ue808′ font=’entypo-fontello’]
[av_textblock size=” font_color=” color=”]
To make upholstered arbor convenient to haul, we decided to build it three smaller pieces. We contemplated whether we should attempt this in mild steel tubing or wood. We could easily go either way. Our shop has a couple of very nice CNC routers which can translate our computer sketch to wood very nicely. We also have state of art metal bending machine from Eastwood co.
But we went a totally new and unintended direction. We have recently acquired a large format plotter and decided to plot our design on paper and saw it out with Festool Carvex. Since it was going to be upholstered arbor anyway, there was no need to use high-end plywood. We went with flooring grade three-quarters plywood.
[/av_textblock]
[/av_two_third]
[av_one_third min_height=” vertical_alignment=’av-align-top’ space=” margin=’0px’ margin_sync=’true’ padding=’20px’ padding_sync=’true’ border=” border_color=” radius=’0px’ radius_sync=’true’ background_color=’#e4e4e4′ src=” attachment=” attachment_size=” background_position=’top left’ background_repeat=’no-repeat’]
[av_textblock size=” font_color=” color=”]
More Information
[/av_textblock]
[/av_one_third]
[av_section min_height=” min_height_px=’500px’ padding=’default’ shadow=’no-shadow’ bottom_border=’no-border-styling’ id=” color=’main_color’ custom_bg=’#e4e4e4′ src=” attachment=” attachment_size=” attach=’scroll’ position=’top left’ repeat=’no-repeat’ video=” video_ratio=’16:9′ overlay_opacity=’0.5′ overlay_color=” overlay_pattern=” overlay_custom_pattern=”]
[av_one_half first min_height=” vertical_alignment=’av-align-top’ space=” margin=’0px’ margin_sync=’true’ padding=’0px’ padding_sync=’true’ border=” border_color=” radius=’0px’ radius_sync=’true’ background_color=’#d4d4d4′ src=” attachment=” attachment_size=” background_position=’top left’ background_repeat=’no-repeat’]
[av_masonry_gallery ids=’1301,1290,1291,1324,1294,1326,1292,1328,1330,1295,1296,1327′ items=’12’ columns=’4′ paginate=’pagination’ size=’fixed’ gap=’1px’ overlay_fx=” caption_elements=’none’ caption_display=’always’ container_links=’active’ id=”]
[av_hr class=’custom’ height=’50’ shadow=’no-shadow’ position=’center’ custom_border=’av-border-thin’ custom_width=’50px’ custom_border_color=” custom_margin_top=’10px’ custom_margin_bottom=’10px’ icon_select=’no’ custom_icon_color=” icon=’ue808′ font=’entypo-fontello’]
[av_textblock size=” font_color=” color=”]
[/av_textblock]
[/av_one_half][av_one_half min_height=” vertical_alignment=’av-align-top’ space=” margin=’0px’ margin_sync=’true’ padding=’0px,20px,20px,20px’ border=” border_color=” radius=’0px’ radius_sync=’true’ background_color=’#e4e4e4′ src=” attachment=” attachment_size=” background_position=’top left’ background_repeat=’no-repeat’]
[av_textblock size=” font_color=” color=”]
Step-by-step Making of Upholstered Arbor
Once the paper template glued to the board, the sawing started.
Each of the three pieces of the decorative arbor is constructed with three ribs. We carefully cut one rib for each of the three pieces and routed the rest with a handheld trim router. This is an age-old technique which woodworkers use to create a replica. Once all the nine ribs were cut then came the assembly. For the assembly bars, we cut out notches in the ribs to give lateral support.
Since the design was first generated on the computer and printed on a plotter we were very confident that the pieces will come together perfectly. Still, we did some dry assembly to make sure that everything is OK.
[/av_textblock]
[av_textblock size=” font_color=” color=”]
Important Factors While Making an Arbor
The goal from the beginning was to make the arbor light enough for a two-person team to easily carry it and install it. This is why we cut out several portions of the 3-quarter plywood. We played around with the design on the computer for how much plywood to remove without losing the structural integrity. As soon as the entire skeleton of the arbor was completed, we started covering all the sides with quarter-inch flexible plywood.
We painted the inside of the skeleton black. We did this to make it dark enough so just-in-case if there was gape in the flowers then the inside would not show.
[/av_textblock]
[/av_one_half][av_three_fifth first min_height=” vertical_alignment=’av-align-top’ space=” margin=’0px’ margin_sync=’true’ padding=’0px,20px,20px,20px’ border=” border_color=” radius=’0px’ radius_sync=’true’ background_color=’#e4e4e4′ src=” attachment=” attachment_size=” background_position=’top left’ background_repeat=’no-repeat’]
[av_textblock size=” font_color=” color=”]
Step-by-step Process of Upholstery
We went hunting for the cloth to cover the arbor. We found some at Jo-Ann Fabrics and Crafts and just loved it but they didn’t have enough. We needed 20 yards but there was only 10 available at this location and the thing with this company is that there is no guarantee if the same material will be available at any other locations. So we got what was available and rushed to the other nearest locations and luckily we got enough to finish the wedding arbor.
We started by installing the bedding material first. Once the bedding was in place we started to upholsterer the arbor with the waffle print cloth we got. We decided to select light color so the red roses would stand out.
Draping The Sides on Upholstered Arbor
- We first stapled the top and then stretch it inside from over the sides and stapled the other end.
- Once both sides were completed on all the three pieces. We started covering the backs, this was tough as we had to follow the curves and contours.
- While installing the backs we used the sofa-back technique.
- First, we stitched one side by stapling an edge strip to give a smooth edge.
- We got these at the local upholstery supply store and while they sell similar stuff in rolls also, We prefer this as it gives lot more control overturns.
- On the other end of the back, we used the flexible metal tack.
[/av_textblock]
[/av_three_fifth][av_two_fifth min_height=” vertical_alignment=’av-align-top’ space=” margin=’0px’ margin_sync=’true’ padding=’0px’ padding_sync=’true’ border=” border_color=” radius=’0px’ radius_sync=’true’ background_color=’#d4d4d4′ src=” attachment=” attachment_size=” background_position=’top left’ background_repeat=’no-repeat’]
[av_masonry_gallery ids=’1297,1335,1299,1337,1414,1338,1298,1346′ items=’8′ columns=’2′ paginate=’none’ size=’fixed’ gap=’1px’ overlay_fx=” caption_elements=’none’ caption_display=’always’ container_links=’active’ id=”]
[/av_two_fifth][av_hr class=’custom’ height=’50’ shadow=’no-shadow’ position=’center’ custom_border=’av-border-thin’ custom_width=’50px’ custom_border_color=’#f4f4f4′ custom_margin_top=’20px’ custom_margin_bottom=’20px’ icon_select=’no’ custom_icon_color=” icon=’ue808′ font=’entypo-fontello’]
[av_sidebar widget_area=’adsense ads’]
[av_hr class=’custom’ height=’50’ shadow=’no-shadow’ position=’center’ custom_border=’av-border-thin’ custom_width=’50px’ custom_border_color=’#f4f4f4′ custom_margin_top=’20px’ custom_margin_bottom=’20px’ icon_select=’no’ custom_icon_color=” icon=’ue808′ font=’entypo-fontello’]
[av_three_fifth first min_height=” vertical_alignment=’av-align-top’ space=” margin=’0px’ margin_sync=’true’ padding=’0px,20px,20px,20px’ border=” border_color=” radius=’0px’ radius_sync=’true’ background_color=’#e4e4e4′ src=” attachment=” attachment_size=” background_position=’top left’ background_repeat=’no-repeat’]
[av_textblock size=” font_color=” color=”]
Metal Screen for Flower Decoration on Upholstered Arbor
After all the fabric was nicely installed, we started covering the bottom of the arbor with muslin and once again, just like with the fabric, we were fighting to keep wrinkles out.
Next step was to install the metal screen to mount the flowers. we were able to do this with the Arrow stapler.
Finally, the finished wedding arbor is an awesome piece of creativity.
[/av_textblock]
[av_textblock size=” font_color=” color=”]
We thank AK Lodhi Films for the opportunity to work on such a nice decorative piece which will embellish so many occasions.
[/av_textblock]
[/av_three_fifth][av_two_fifth min_height=” vertical_alignment=’av-align-top’ space=” margin=’0px’ margin_sync=’true’ padding=’0px’ padding_sync=’true’ border=” border_color=” radius=’0px’ radius_sync=’true’ background_color=’#d4d4d4′ src=” attachment=” attachment_size=” background_position=’top left’ background_repeat=’no-repeat’]
[av_masonry_gallery ids=’1421,1349,1300,1463′ items=’4′ columns=’2′ paginate=’pagination’ size=’fixed’ gap=’1px’ overlay_fx=” caption_elements=’none’ caption_display=’always’ container_links=’active’ id=”]
[/av_two_fifth]
[/av_section]
[av_one_full first min_height=” vertical_alignment=’av-align-top’ space=” margin=’0px’ margin_sync=’true’ padding=’20px’ padding_sync=’true’ border=” border_color=” radius=’0px’ radius_sync=’true’ background_color=’#e4e4e4′ src=” attachment=” attachment_size=” background_position=’top left’ background_repeat=’no-repeat’]
[av_textblock size=” font_color=” color=”]
We take orders for custom woodworking, furniture restoration and refinish in Pearland, Houston TX. Call +1-832-481-9144 for more details.
[/av_textblock]
[/av_one_full]
[av_sidebar widget_area=’adsense ads’]

